On Windows 11, you get a wide range of audio customization options. You can configure your audio device to perform how you want, or else you can install equalizer software to improve your gaming and media entertainment experience.
Yes, the audio output depends on many factors, such as the hardware, software driver you use, and more. If we leave these two things, you still have much to do to improve your gaming and media entertainment experience.
You can manually customize the audio settings on your Windows 11 computer to improve the sound quality. Hence, if you want to improve sound quality on Windows 11 PC, you have landed on the right page.
Best Ways to Improve Sound Quality on Windows 11
Below, we have shared a few best methods to improve the sound quality on Windows PC. The methods will be straightforward; follow them as mentioned. Here’s what you need to do.
1) Enhance Audio From Windows 11 Settings
This method will enable audio enhancement in Windows 11 using the Settings app. Here are some of the simple steps you need to follow.
1. First, click the Windows 11 Start button and select Settings.

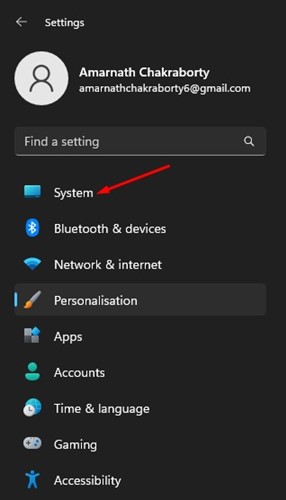
2. On the Settings app, switch to the System tab.
3. On the right side, select Sound.

4. Next, on All sound devices, select your output device.

5. On the next screen, scroll down and enable the toggle for Enhance Audio.

That’s it! This will enable audio enhancement for your selected output device. You must repeat the steps for all output devices connected to your PC.
2) Enhance Audio from Control Panel
This method will use the Control Panel utility to enhance the audio. For that, follow some of the simple steps we have shared below.
1. Click on the Windows 11 Search and type in Run. Next, open the RUN app from the list of options.

2. Type and enter the Enter button on the RUN dialog box.

3. Now switch to the Playback tab and select your audio output device. At the bottom right corner, click on Properties.

4. On the Output Device properties, switch to the Enhancements tab and enable the enhancements you want to apply. Once done, click on the Apply button and then on Ok.

That’s it! This is how you can enable audio enhancement on your Windows 11 PC to improve sound quality.
3) Set a Higher Sample Rate
You can set a higher sample rate for audio to improve the sound quality on Windows. Setting a higher sample rate and bit depth will also help if the audio is distorted.
You can access the System Settings of Windows 11 to set a higher sample rate and bit depth for audio. Here’s what you need to do.
1. Click on Windows 11 Start button and select Settings.

2. When the Settings app opens, switch to System > Sound.

3. On the right side, click on the Speakers on the output.

4. On the output settings, click the drop-down next to the Format and set a higher sample rate and bit depth.

That’s it! You can experiment with different sample rates and bit depth on Windows 11.
4) Make Changes to the Audio Equalizer
Another best thing you can -do to get better audio quality on Windows 11 is to make changes to the audio equalizer. Here’s how to modify the equalizer of Windows 11 to improve the sound quality.

- Right-click on the Speaker icon on the Taskbar and select Sound Settings.
- On the Sound Settings, click on More Sound settings.
- On the Sound, double-click on the connected audio device.
- Next, on the Speakers Properties, check the Equalizer.
- Now click on the three dots menu icon next to Settings and adjust the equalizer bands per your preferences.
That’s it! This is how you can modify the Windows 11 audio equalizer to improve sound quality.
5) Update the Sound Drivers
Updating the sound drivers could be the best option to improve sound quality. You also need to update the audio drivers if facing audio distortion issues. Here’s how to update the Sound Drivers on Windows 11.
1. Cick the Windows 11 search and type in Device Manager. Next, open the Device Manager app from the list.

2. Expand the Device Manager’s Sound, video, and game controllers. Next, right-click on your audio output device and select Update driver.

3. On the Update Drivers Window, select ‘Search automatically for drivers‘
That’s it! Now Windows 11 will automatically scan for a new version of the Audio driver and will install it on your PC.
6) Enable Spatial Audio
Spatial Audio is a new audio enhancement feature introduced in Windows 10. When you activate Spatial Audio on your computer, the audio will feel that it’s playing around you instead of through speakers or headphones. The feature is also available in the latest Windows 11 operating system. Here’s how to enable spatial audio in Windows 11.
1. First, click on the Windows 11 settings and select Settings.
2. On the Settings app, switch to the System tab on the left side.
3. On the right side, scroll down and click on the Sound.
4. Scroll down to the Advanced section and click on All sound devices.
5. Now click on the output device you are using. On the output device properties, scroll down to the Spatial sound section.
6. Click the drop-down beside Spatial audio and select Windows Sonic for Headphones.

That’s it! This is how you can enable Spatial audio on your Windows 11 computer.
Also read: How to Mount ISO Images in Windows 11
So, these are some of the best ways to improve sound quality on your Windows 11 PC. If you need more help improving your PC’s sound quality, let us know in the comments below.